
Create a Location
Build a new mechanic shop in game with /mechaniccreator, step by step, from the job to the last lift.
What it is
The mechanic creator is an in-game menu for admins. With it you make a new mechanic shop (or change one) without typing coordinates: you give the shop a name and a job, set the prices, and then walk around and place every point (customer bays, car lifts, parts counters, stashes) where you look.
Everything is kept in a working copy until you press Save. Then the server checks it, writes it to
creator/data/locations.json and builds the shop file the mechanic script reads. After a save you restart
mvx_mechanic and the shop is live.
Before you start
You need three things:
- Admin rights. Only the ESX groups
ownerandadmincan open and save the creator. The server checks this again on every load and every save. - A job for the shop (owned shops only). Every owned shop is run by one ESX job. GearHead Customs uses the job
mechanic. For a second shop with its own staff and money, make a new job first (step 2 below). - A place. The building should already exist in the map. If the shop has doors you want to lock, see Doorlock System.
1. Open the creator
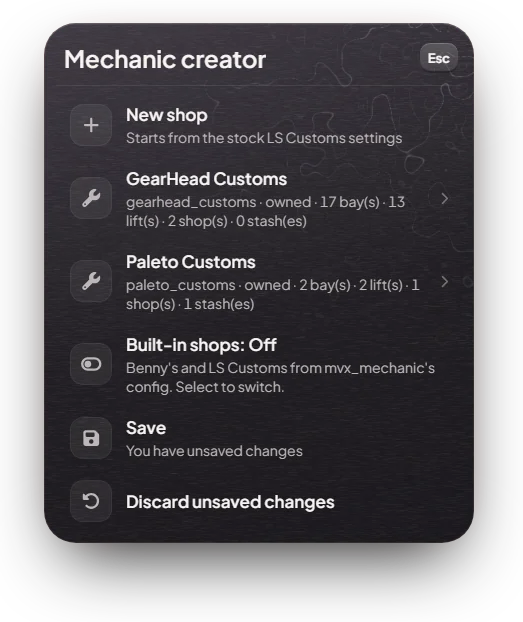
Type /mechaniccreator in chat. The Mechanic creator menu opens with:
| Option | What it does |
|---|---|
| New shop | Start a new shop. It begins with the stock LS Customs settings, so you only change what is different. |
| One row per shop | Open that shop. The line under the name shows its id, type and how many bays, lifts, shops and stashes it has. |
| Built-in shops: On/Off | Switches Benny's and LS Customs (the two shops written in config.lua) on or off. They are Off on this server. |
| Save | Checks and saves everything. It says "You have unsaved changes" when you have changed something. |
| Discard unsaved changes | Goes back to the last save. Only shown when something changed. |
While a shop's menus are open, its points are drawn in the world so you can see what you already placed.
2. Make the job (owned shops)
An owned shop needs an ESX job that already exists on the server. The creator lists every job it finds, and it
refuses to save a job name that does not exist. /setjob also only works for jobs that exist.
On this server the mechanic job is mechanic with five ranks: 0 Recruit, 1 Novice, 2 Experienced, 3 Leader,
4 Boss. You can give a new shop the same mechanic job: then the same staff and the same company account work at
both shops.
For a shop with its own staff and its own money, add a new job to the database. Jobs are not made in game for
mechanic shops; you add them with SQL (for example in HeidiSQL or phpMyAdmin, database mavix). Example for a shop
called Paleto Customs with the job name paletomech:
INSERT INTO jobs (name, label, whitelisted) VALUES ('paletomech', 'Paleto Customs', 1);

INSERT INTO job_grades (job_name, grade, name, label, salary, skin_male, skin_female) VALUES
  ('paletomech', 0, 'recruit', 'Recruit',       180, '{}', '{}'),
  ('paletomech', 1, 'mechanic', 'Mechanic',     200, '{}', '{}'),
  ('paletomech', 2, 'lead',    'Lead Mechanic', 230, '{}', '{}'),
  ('paletomech', 3, 'boss',    'Boss',          280, '{}', '{}');

INSERT INTO addon_account (name, label, shared) VALUES ('society_paletomech', 'Paleto Customs', 1);jobs: the job itself. The name (herepaletomech) is what you pick in the creator. Use only small letters, numbers and_.whitelisted = 1means only a boss or staff can give it, and it leaves a fired player's F3 job list.job_grades: one row per rank, starting at 0. The top rank should be namedboss.salaryis the pay every paycheck; mechanic ranks on this server pay $180–$280.addon_account: the shop's company account, alwayssociety_+ the job name. Customer payments go in here, and counter parts are paid from it.
Then restart the server at a quiet time, so ESX loads the new job and the new company account. (Admins can type
/refreshjobs to load new jobs without a restart, but the company account only appears after a restart.)
The job name in the database, in the creator and in /setjob must be the same, small letters included.
paletomech and PaletoMech are two different jobs.
3. Create the shop
Pick New shop and fill in the form:
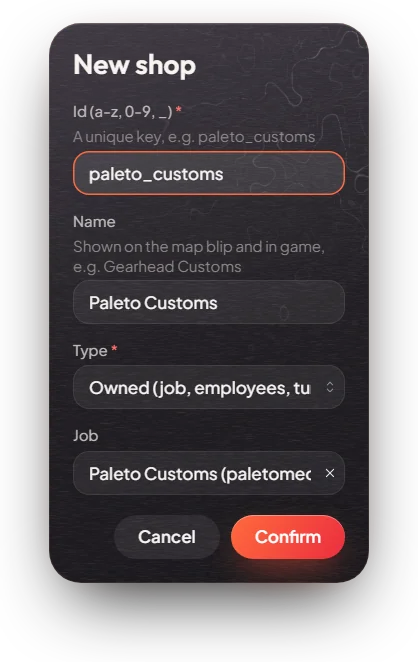
| Field | What it means | Example |
|---|---|---|
| Id | A unique key for the shop: 1–32 characters, only a-z, 0-9 and _. It is saved in the mechanic_data table with the shop's balance. Changing it later starts a fresh balance. | paleto_customs |
| Name | Shown on the map blip and in game. Up to 50 characters. If the boss later renames the shop on the tablet, that name is kept. | Paleto Customs |
| Type | Owned (job, employees, tuning) or Self-service (anyone). See Self-Service Shops. | Owned |
| Job | The ESX job that runs the shop. Required for an owned shop. A self-service shop may leave it empty. | paletomech |
The shop opens. Its menu has these rows:
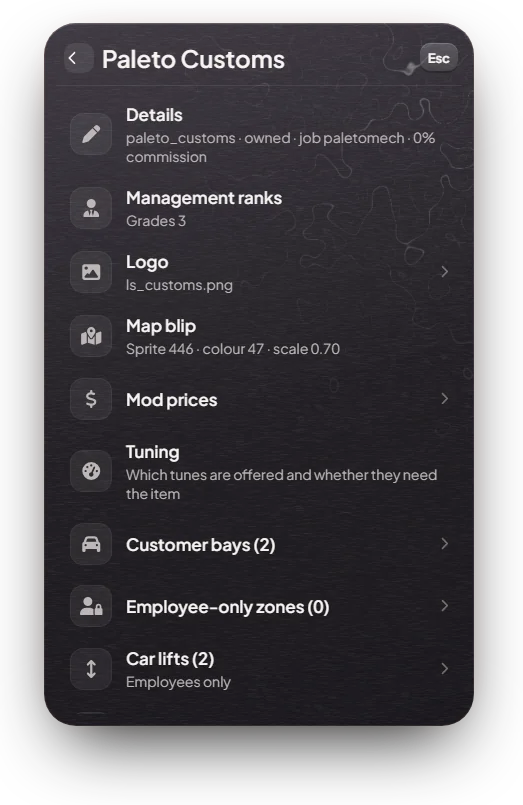
| Row | What you set |
|---|---|
| Details | Id, name, type, job and Commission (%): the share of a finished order paid from the company account to the mechanic who did it (0–100). GearHead uses 0. |
| Management ranks | Owned shops. Which ranks of the job are managers (see step 7). |
| Logo | A picture from mvx_mechanic/logos: bennys.png, ls_customs.png or gearhead_customs.png, or no logo. |
| Map blip | Show a blip or not, Sprite (icon number, see the FiveM blip list), Colour and Scale. |
| Mod prices | Price of each mod category (step 6). |
| Tuning | Owned shops. For each tune (engine swaps, drivetrains, turbocharging, tyres, brakes, drift tuning, gearboxes): offered or not, and whether it needs the item. |
| Customer bays, Employee-only zones, Car lifts, Shops, Stashes | The points of the shop (step 4). |
| Delete shop | Removes the shop from the working copy (step 9). |
4. Place the points
There are five kinds of point. Open a list (for example Car lifts (0)) and pick Add …:
| Point | What it does | Who can use it | Limits |
|---|---|---|---|
| Customer bay | A square zone. A driver inside it presses E (Customise vehicle) to open the mod menu. Each bay can show the map blip. | Everyone | Up to 30 bays and zones. At least one, or the shop has no mod menu. |
| Employee-only zone | The same mod menu, but only staff of the job see it (for a staff-only workshop). | Staff | Shares the 30 with bays |
| Car lift | A real lift. Drive on it and press E (Use car lift) to raise or lower the car. | Staff (owned shop), anyone (self-service) | Up to 30 |
| Shop (parts counter) | A counter that sells items. With a ped, use the third eye on the clerk; without, stand in its zone. | Staff only, needs a job | Up to 20, up to 100 items each |
| Stash | Shared storage for the staff. | Staff only, needs a job | Up to 20 |
There is no separate duty, boss or garage point: staff go on duty, manage the shop and connect cars on the tablet (see Mechanics & Tablet).
The placement tool
When you add or move a point, a see-through ghost of it follows where you look (up to 40 m away). For a lift it is a lift with a car on it. A prompt shows the keys:
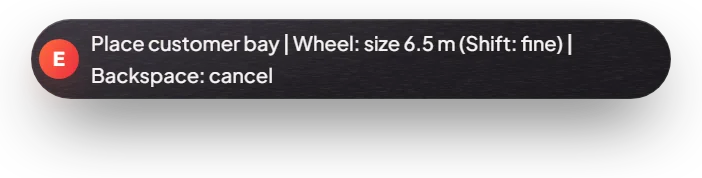
| Key | What it does |
|---|---|
| E | Place it here |
| Mouse wheel | Bays and zones: size. Lifts, shops and stashes: turn. |
| Shift + wheel | Fine steps (0.1 m or 1°) |
| Ctrl + wheel | Row of lifts only: the gap between lifts |
| Backspace | Cancel |
Everything is put on the floor for you, so you only aim at the ground where it should go.
Settings of each point
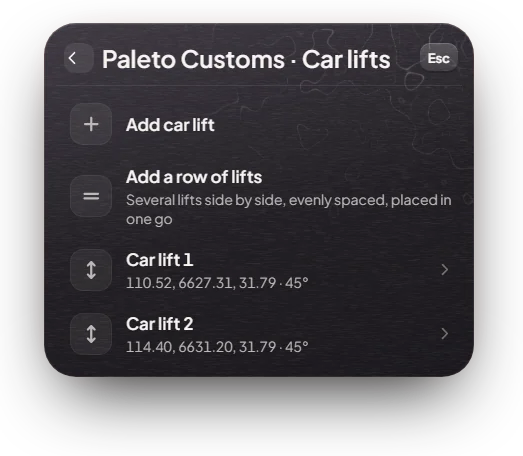
After placing, open the point in its list. Every point has Teleport to, Move (place it again) and Remove. Bays, zones, shops and stashes also have Settings; shops have Items.
| Point | Settings |
|---|---|
| Customer bay / employee zone | Size (m) from 0.5 to 50, and Show the map blip here. |
| Shop | Name, Zone size (when there is no ped), Use a ped and Ped model (default s_m_m_lathandy_01). When you add a shop you choose to Start from an empty shop or the stock Servicing Supplies or Advanced Upgrades list. |
| Shop → Items | Add, change or remove items: Item name exactly as in ox_inventory (for example engine_oil), Label and Price. |
| Stash | Name, Slots (1–500), Max weight in grams (default 50,000 = 50 kg), zone size, ped. |
Add a row of lifts places several lifts side by side in one go: choose How many lifts (2–10, default 5) and the Gap between lifts (3–12 m, default 5.5 m, centre to centre). 5.5 m keeps each lift's work area clear of the next.
5. Sizes and turning
| What | Default | Range | Step (fine with Shift) |
|---|---|---|---|
| Customer bay / zone size | 6.5 m (bay), 3 m (staff zone) | 1–30 m while placing (0.5–50 m in Settings) | 0.5 m (0.1 m) |
| Shop / stash zone size | 2 m | 0.5–6 m while placing (up to 10 m in Settings) | 0.5 m (0.1 m) |
| Turning lifts, shops, stashes | – | 0–360° | 5° (1°) |
A bay is a square box of that size around its point, as high as it is wide. Make it big enough for a whole car, but keep bays apart: two bays must not overlap.
6. Prices and self-service
Open Mod prices. There is one row per category: Repair, Performance, Cosmetics, Stance, Respray, Wheels, Neon lights, Headlights, Tyre smoke, Bulletproof tyres and Extras.
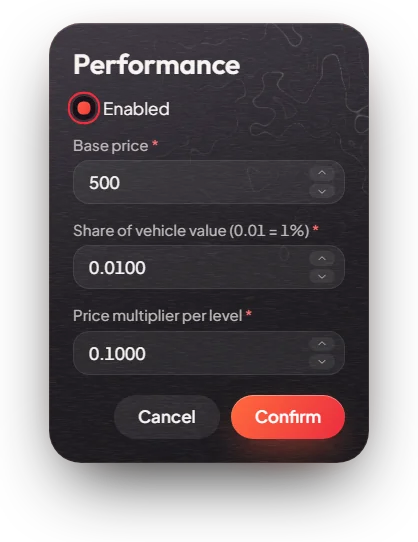
| Field | What it means |
|---|---|
| Enabled | Offer this category at this shop. |
Share of vehicle value (percentVehVal) | The price is this share of the car's value. 0.01 = 1%. Used on this server, because Config.ModsPricesAsPercentageOfVehicleValue = true. The car's value is its price in the ESX vehicle list, or $30,000 for a car that is not in the list. |
Base price (price) | A fixed price. Only used if Config.ModsPricesAsPercentageOfVehicleValue is set to false. |
Price multiplier per level (priceMult) | Performance, Cosmetics and Wheels only. Each higher level costs more: price × (1 + level × multiplier). |
Example: a $100,000 car with Performance at 0.01 and multiplier 0.1: a level 1 part costs
$1,000 × 1.1 = $1,100, a level 3 part $1,000 × 1.3 = $1,300.
Who gets the money:
- Owned shop: the customer pays by cash or bank when placing the order, and the money goes into the company
account (
society_<job>). A mechanic then installs it. - Self-service shop: the customer pays by cash or bank and gets the mods at once. The money does not go to anyone.
7. Staff and the owner
There is no separate "owner" field. The shop belongs to its job:
- Everyone with the shop's job is staff (mechanic role): lifts, counters, stashes, tablet and work orders.
- Ranks you tick in Management ranks are managers: on the tablet they also see Management (balance, deposit, withdraw), hire, change roles and fire. For GearHead this is rank 4 (Boss). New shops start with rank 4 ticked, so for a job whose top rank is 3, change it to 3.
- To make someone the owner, give them the top rank:
/setjob <id> paletomech 3.
Managers hire on the tablet (Management → Employees): the new person must stand within 5 m and accept within a minute. They get the shop's job.
8. Save
Back in the main menu, press Save. The server then:
- checks every field again (ids, job exists, logo file exists, sizes, prices, max 50 shops),
- writes the data to
mvx_mechanic/creator/data/locations.json, - builds
mvx_mechanic/shared/zz-creator-locations.luafrom it and test-runs that file. If it does not work, nothing is saved and the reason is shown. - writes the shop name into the
mechanic_datatable (unless the boss already renamed the shop on the tablet).
If a field is wrong you see a message naming it, for example Shop "paleto_customs" job: "paletomech" is not a job.
Nothing is saved until every shop is valid.
The shop file is only read when the script starts. After Save, type restart mvx_mechanic in the server console
or txAdmin. Anyone in the mod menu or on the tablet is thrown out, so do it at a quiet time.
Never edit shared/zz-creator-locations.lua by hand: the creator rewrites it on every save.
9. Edit, move or delete
- Change settings: open the shop and change any row, then Save and restart
mvx_mechanic. - Move a point: open it, pick Move and place it again. Teleport to takes you to it first.
- Remove a point: open it, pick Remove and confirm.
- Delete a shop: open it, pick Delete shop and confirm. Its balance stays in the database under its id.
- Changed your mind? Discard unsaved changes goes back to the last save.
GearHead Customs was laid out by the owner. Only change it on purpose.
10. Test it
After restart mvx_mechanic:
- The map blip shows at every bay with Show the map blip here on.
- Driving into a customer bay shows [E] Customise vehicle.
- Staff of the job can use the lifts, open the counters and stashes, and log in to the shop on the tablet.
11. Common mistakes
| Problem | Why | Fix |
|---|---|---|
| "… is not a job" on save | The job is not in the database, or the name differs (capitals, spaces). | Add the job with SQL, restart, and pick it from the list. |
| No Customise vehicle prompt | The shop has no customer bay, the bay is too small or placed inside a wall, or mvx_mechanic was not restarted. | Add or resize a bay, Save, restart. |
| Staff can't open counters or stashes | Their job is not the shop's job, or the shop has no job. | /setjob <id> <job> <rank>. |
| Manager sees no Management on the tablet | Their rank is not in Management ranks. | Tick the rank, Save, restart. |
| Counter purchases fail | The company account is empty or missing. | Deposit money on the tablet; for a new job, check the addon_account row and restart. |
| Bays open the wrong menu or flicker | Two bays (or a bay and another shop's bay) overlap. | Move them apart or make them smaller. |
| Lift or ped inside a wall or floor | Aimed at a wall while placing. | Move and aim at the floor. |
| Doors can be opened by anyone | Doors are not part of the creator. | Lock them with /doorlock, see Doorlock System. |
| New balance after renaming | The Id was changed. | Keep the id; change only the Name. |
Mechanic shop doors are not locked out of the box. Create them in game with the doorlock menu (/doorlock, staff only). See Doorlock System and the official ox_doorlock guide.
Keys & commands
| Key / command | What it does | Who |
|---|---|---|
/mechaniccreator | Open the creator | ESX groups owner, admin |
| E / wheel / Shift / Ctrl / Backspace | Place, size or turn, fine steps, lift gap, cancel | While placing |
/refreshjobs | Load new jobs from the database | Admins |
restart mvx_mechanic | Apply a saved creator change (server console) | Server owner |
Config options
Creator settings: [esx]/[jobs]/[mechanic]/mvx_mechanic/creator/config.lua.
| Option | What it changes | Example |
|---|---|---|
CreatorConfig.Command | The chat command | 'mechaniccreator' |
CreatorConfig.Permission | ESX groups that may use it | { 'owner', 'admin' } |
CreatorConfig.Placement | Reach, size and turn steps, row of lifts defaults | MaxDistance = 40.0, RowSpacing = 5.5 |
CreatorConfig.Defaults | What a new shop starts with: type, job, management ranks, logo, blip, mod prices, tuning, ped, counter items, stash size | jobManagementRanks = { 4 } |
CreatorConfig.KnownLogos | Logo files offered | bennys.png, ls_customs.png, gearhead_customs.png |
Admin Quick Test
This builds a test shop called Paleto Customs from zero in the open car park at the trucker base, then removes it.
Setup
- Add the job: run the SQL from step 2 (job
paletomech, ranks 0–3, accountsociety_paletomech), then restart the server. - Check it loaded:
/setjob me paletomech 3. You see your job change to Paleto Customs, Boss. (If you see an error, the job is not in the database.) - Give yourself money and a tablet:
/giveaccountmoney me bank 50000,/giveitem me mechanic_tablet 1.
Build the shop
- Teleport to an open car park:
/tp -1161.38 -2163.77 13.38(trucker base). - Type
/mechaniccreator. The Mechanic creator menu opens. - New shop: Id
paleto_customs, NamePaleto Customs, Type Owned, Job Paleto Customs (paletomech). Confirm. The shop menu opens. - Management ranks: tick rank 3, untick 4. The row shows "Grades 3".
- Customer bays (0) → Add customer bay. Aim at the ground, scroll to about 6.5 m, press E. Add a second bay a few metres away. The list shows 2 bays.
- Car lifts (0) → Add a row of lifts → 2 lifts, gap 5.5 m. Aim, turn with the wheel, press E.
- Shops (0) → Add shop → Start from Servicing Supplies, tick Use a ped. Place it. Open it → Items: the stock items are listed (engine oil $45 …).
- Stashes (0) → Add stash → name
Parts Bin, 10 slots, 50,000 g. Place it. - Mod prices → Performance: check the share is
0.01and the multiplier0.1. - Back to the main menu → Save. You see a success message; the main menu now says "Nothing changed since the last save".
Make it live
- In the server console type
restart mvx_mechanic. Wait for it to start. - A Paleto Customs blip shows at the bays.
Test it
- Spawn a car
/car sultan, drive into a bay: [E] Customise vehicle shows. Press E, pick a respray, Place Order, pay by bank. "Your Order Has Been Placed". - Third eye on the counter clerk: the Servicing Supplies counter opens. Open the stash: the Parts Bin opens.
- Drive onto a lift and press E: the lift goes up.
- Type
/tablet, pick Paleto Customs, log in. Management shows the order money in the balance. Work Orders shows your order. /setjob me unemployed 0and walk to the counter: it no longer opens (staff only).
Clean up
/mechaniccreator→ Paleto Customs → Delete shop → confirm → Save, thenrestart mvx_mechanic. The blip is gone. (Remove thepaletomechjob rows from the database if you don't need them.)
If it doesn't work: "is not a job" means the SQL was not run or the server was not restarted. No prompt in the bay
means mvx_mechanic was not restarted after Save, or the bay is too small. Only ESX groups owner and admin can open
the creator.